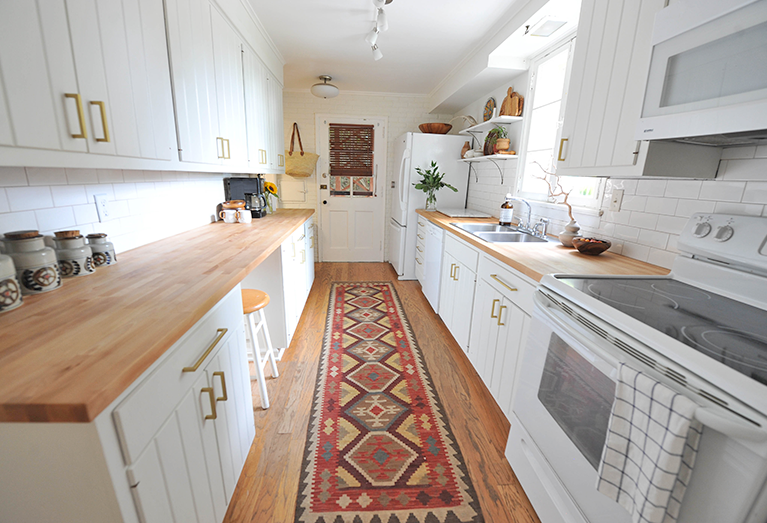

The day is finally here! I am so excited to share our kitchen. It has been a LONG time coming and this project felt, at times, as if we tackled more than we could handle. All of the work of this remodel was done by Rich, myself and gracious friends and family willing to lend expertise and muscle. Despite its challenges, we finished. And all of the blood, sweat and tears (yes, literally) were worth it because we ADORE this space.
Here's the before shot of our kitchen. The photo quality isn't great, but they are the most forgiving and appealing photos I could track down. I don't need to explain the cons of our previous kitchen, but our main issues were the fluorescent lighting, dark wood cabinetry, beat up/burnt laminate countertops, butter yellow brick accent wall, and fake brick as backsplash. I also had a hard time with all the upper cabinetry. Since it's a galley kitchen layout, I didn't have anywhere to do all of my food prep, so some of the upper cabinets had to go to give it a more open feel with additional work space.


And in case you missed that...


Refinishing the cabinetry was, by far, the most labor intensive part of this remodel. We wanted to keep the original cabinets because they are a great brand, Wood-Mode, and the wood itself was in good condition. Plus, I dig the cabinet style as it mimicks the white paneled look we have throughout the rest of the house. So we broke out the white paint.
The process included cleaning, deglossing, and sanding (using multiple grits) until they were smooth. Then we primed using Zinsser Shellac primer. We have painted a TON of wood in our house, and believe me when I say this is the only primer that worked for us (water based just didn't get the job done). We painted them using 2-3 coats of CabinetCoat in White Dove. This product is amazing and worth every penny. This self-leveling paint has a protective enamel coating, so even with Scout regularly nose-diving for food scraps, our cabinets don't have a single chip and look like a professional job.

The countertops are IKEA's Numerar butcher block in beech. We needed three 73 inch pieces, and had some leftover that we made into cutting boards. We were worried about care and maintenance of unsealed butcher block, but it has held up beautifully with regular use of mineral oil.


Our kilim runner rug is one of my favorite parts of the kitchen. I have kilim rugs all over the house and just can't get enough of them. It brings much-needed color into the space and their low pile quality holds up to high foot traffic. I snagged it almost a year ago, and even though it's a one of a kind pattern, you can still find plenty like it online.

Our entire remodel was extremely budget conscious, but when it came to picking brackets for the open shelving, Rich and I both felt like we couldn't skimp on hardware. We spent a good week researching open shelving designs and chose the brass wishbone brackets from Anthropologie. They matched the gold/brass cabinet pulls and have a sleek look from all angles. For the horizontal shelf, we bought a 1x8 board that we cut in half and primed/painted them using the exact same materials as the cabinets.

White subway tile is paired with a brown-gold grout. Rich and I tested at least four different grout colors with the white tile before choosing this. It may just be that we are perfectionist color freaks, but picking a grout color other than black or white was tough. We landed on the color Haystack by Polyblend. I've heard some complaints about this grout bubbling, but it worked like a charm for us.
Listen up, my advice is to test a small section of tile before committing to the whole area. Use a hair dryer to quick-dry the spot to be sure you love the color. The amount of light you have in your kitchen and the color of tile you choose will make each grout color look very different.


Are you thinking about doing a kitchen remodel? Have you done one recently? Ask any questions or tell me about your own experience in the comments!
{next house reveal: the breakfast nook!}
*We recently updated our kitchen's outlets and switches and the "before and after" is pretty dramatic.


Beautiful! We used Anthro brackets for our kitchen shelves too, they're just so nice. Great work, this is a gorgeous before and after.
ReplyDeleteDid you paint the drawer pulls or does Ikea also sell them in brass? They're exactly what I'm looking for!
ReplyDelete@Roseanne We bought IKEA's METRIK handles in stainless steel and sanded them with a fine grit sandpaper (around 400-grit). Then we painted with two coats of Krylon's 18k gold spray paint. After letting them cure for 48 hours, we finished them with a matte clear protective coat of spray paint. We let that dry for another 24 hours and they were ready to roll! They've held up wonderfully, albeit it's only been ~6 months of use, so I'll be sure to do an update on their durability as time goes on!
ReplyDeleteThank you!
DeleteLove this makeover! Came over from AT. It is so light and bright now! I wish I had a window in my kitchen, but that won't happen in my current condo. The gold handles and the details all really work nicely.
ReplyDelete@RitaMarie Thank you so much for your sweet words! Happy you made it over :)
DeleteWhere are your seams on the countertop? I am considering the same thing.
ReplyDeleteThere are seams on both sides of the countertops. We used a combination of 2 fasteners and 3 dowels per seam, to allow them to be tight as possible. We decided against glue in case we ever needed to take them apart down the line. I've heard some people have used wax to hide the seam, but a line is inevitable. Hope that answers your question!
DeleteIt did. Thank you!
DeleteI did the same IKEA counters butted end to end in a long run. I wanted to have a transition strip of the same counter cut from a leftover piece---about 1.5" wide running perpendicular to the strips in the butcherblock, the way they sometimes do transitions in strip flooring from one room to the next. I mean, if you have to have a seam, why not make it a feature instead of trying to disguise it, right? But my contractor refused to do it, I think because it was a little more work. Oh well.
Deleteabsolutely stunning! what a beautiful kitchen!!!
ReplyDeletexoxo, kerri
thanks so much, kerri! :)
DeleteThis makeover is great! I love how you completely transformed the kitchen mostly with paint and elbow grease!
ReplyDeleteAbsolutely love it! Where did you get those grey cork-topped jars on the counter?
ReplyDelete-Jack
The grey cork-topped jars on the counter were passed down from my mother- so they're antiques :) I would suggest checking out your local thrift/consignment shops as I've seen similar styles floating around.
Deletehi - love this - using it as inspiration for my kitchen rehab - where did you get cabinet pulls?
ReplyDeleteWe got the cabinet pulls from IKEA. They are the TYDA handles sanded down with a fine grit sand paper, spray painted with a Krylon gold spray paint, and coated with a matte clear coat finish. They're holding up quite well a year later!
DeleteHi Erin!
ReplyDeleteI just found your blog and was wondering where did you find your gorgeous gold utensil holder?
Thank you!